

I. Purpose
Help staff schedule when items are sent to the Kitchen/Bar so they can be prepared at the appropriate time and match the customer’s dining pace.
Staff can send items immediately, select a preset or custom delay, or keep items on Hold. They can also adjust the delay after selecting Fire, provided the items have not yet been sent for preparation, without canceling items or re-entering the order.
II. Instruction Steps
1. Enable scheduled sending to the Kitchen/Bar
- On the dashboard, go to Settings → Sales
- Scroll to Kitchen, click Edit.
- Check Set a schedule for sending items to kitchen.
- Adjust the preset sending delays as needed. The system provides two default options:
- After 20 minutes
- After 10 minutes
- Click Save.
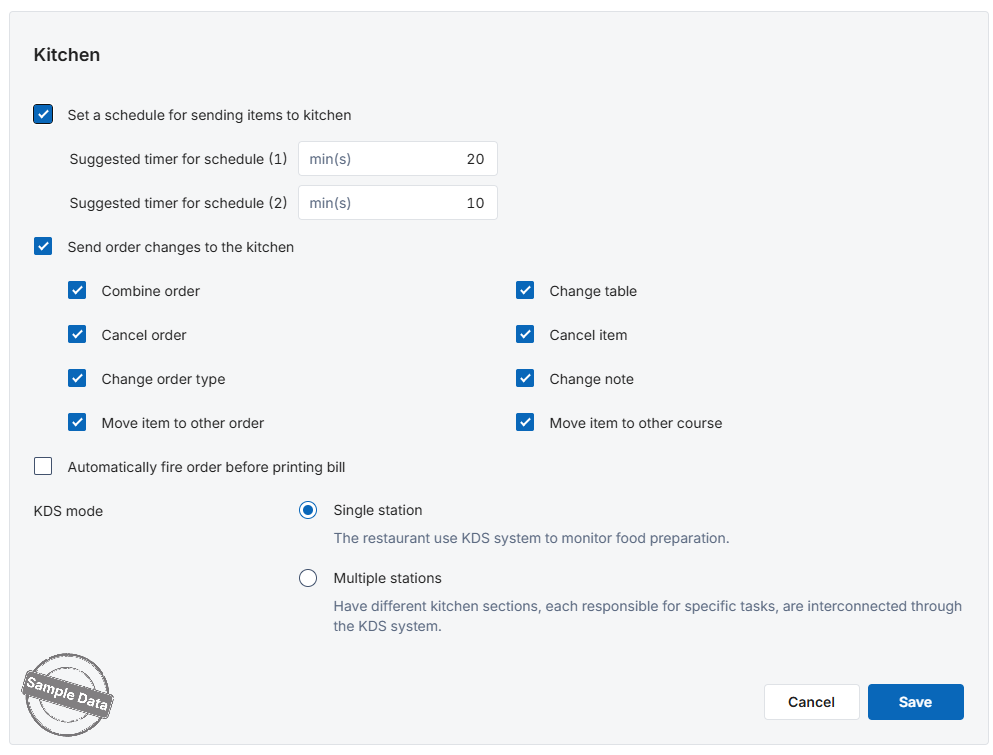 Note: If a preset delay is set to 0 minute, that option will not appear on the POS after the settings are saved.
2. Schedule items on the POS or Tablet
- On the POS or Tablet sales screen, create a Dine-in order and add the customer’s items.
- Tap Fire.
- In the scheduling dialog, select an option for each item:
- Fire now: Send the item to the Kitchen/Bar immediately after saving.
- Preset delay: Select one of the configured sending delays.
- Custom: Enter a different sending delay.
- Hold: Keep the item in the order without sending it to the Kitchen/Bar.

- If you select Custom, enter the number of minutes to wait before sending the item, then tap Done.

- Tap Save to apply the selections.
Notes:
- A custom delay must be greater than 0 and cannot exceed 999 minutes.
- For scheduled items, the countdown starts after you tap Save.
- For items that have not yet been sent to the Kitchen/Bar, staff can add modifiers or cancel the items.

3. Adjust the sending delay after selecting Fire
This applies to Dine-in, Delivery, To-go, and Open Tab orders at restaurants that have enabled Set a schedule for sending items to kitchen.
- On the POS, open the order you want to update.
- Tap Fire to reopen the sending-time selection screen. This button remains available while the order contains items on Hold or waiting to be sent to the Kitchen/Bar.
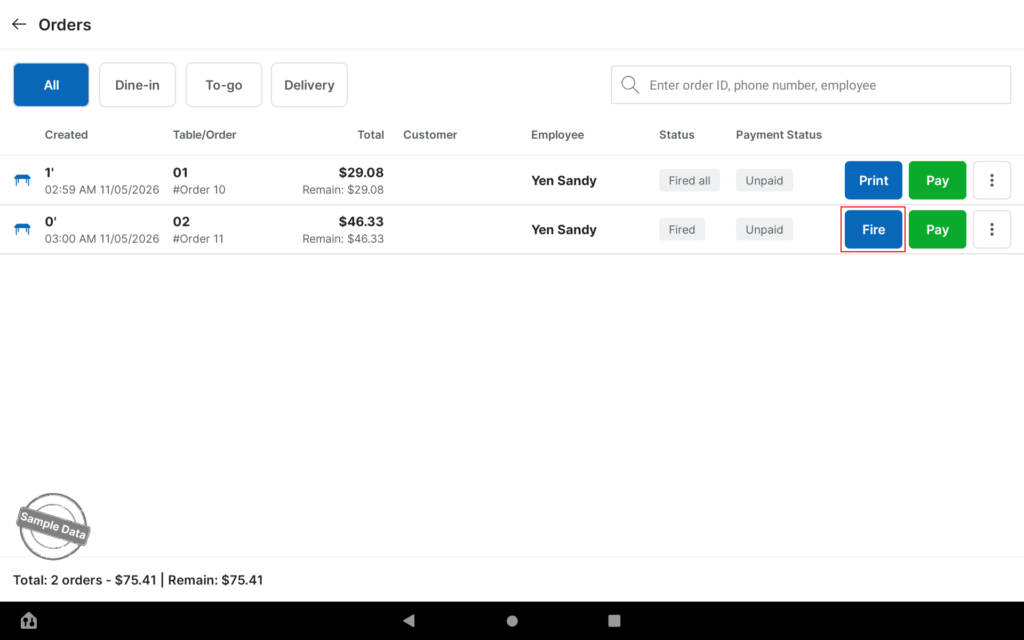
- Select the items you want to update.
- Choose a new option:
- Fire now: Send the items immediately after saving.
- Preset delay: Select a different sending delay.
- Custom: Enter a new sending delay.
- Hold: Keep the items on hold without sending them for preparation.
- Tap Save.
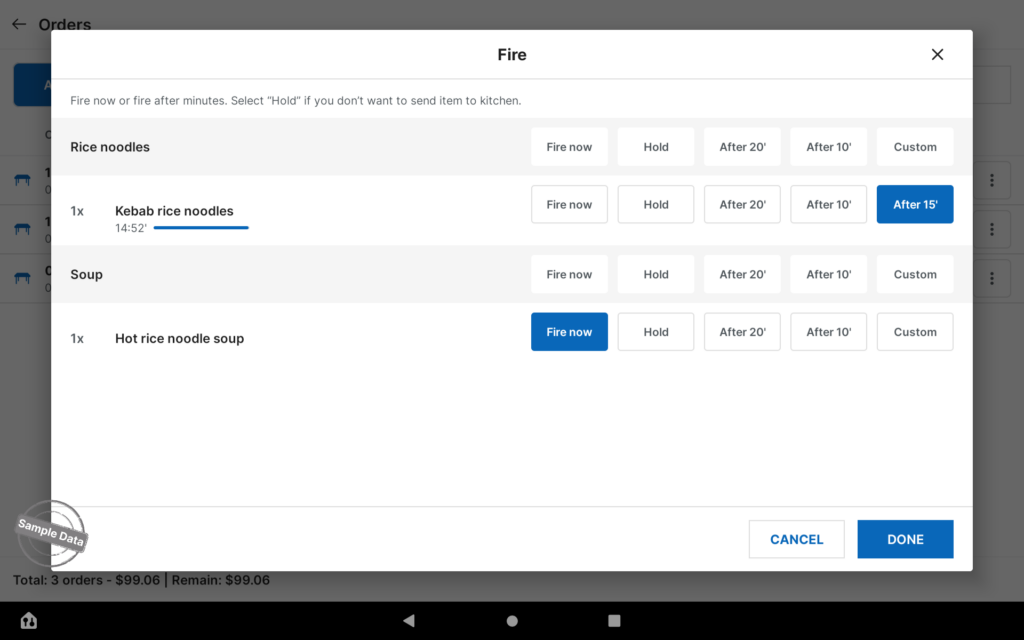
Results:
- With Fire now, the items are sent to the Kitchen/Bar immediately.
- With a new delay, the timer below the item name starts counting down from the time you save.
The new sending time is calculated as follows:
Notes:
- When you reopen the screen, the system retains the previously selected option.
- While you are editing, the newly selected option displays the time and progress bar, but its countdown has not started.
- If you do not change the selection, tapping Save preserves the existing countdown.
- If you select a different option and then return to the original option, tapping Save still restarts the delay from the time you save.
- If an item is successfully sent to the Kitchen/Bar while you are editing, the system does not update that item’s sending delay.
4. Change a previously configured custom delay
- Open the order and tap Fire.
- Tap Custom again for the item you want to update.
- On the numeric keypad, review the previously entered delay.
- Clear the old value and enter a new delay.
- Tap Done to confirm, then tap Save.
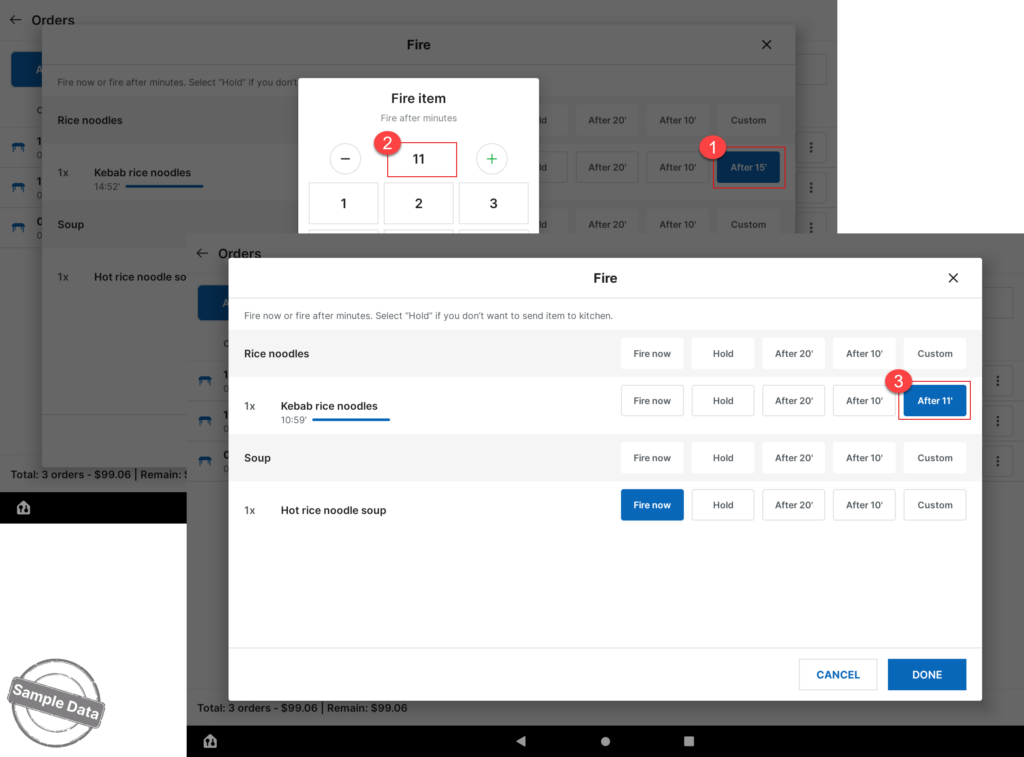
After saving, the system starts counting down using the new delay, beginning at the time you save.
Note: The new custom delay must be greater than 0 and less than 999 minutes.
5. Adjust the sending delay for an Order in Orders Hub
This applies to orders from Ally Now.
- Open Orders Hub → Active.
- Select the order you want to update and reopen the Fire later screen.
- Select a different sending delay.
- If using Custom, tap the field to review the existing delay, clear it, and enter a new value.
- Save the changes.
Note: Adjustments in Orders Hub apply to the entire order, not to individual items.
III. Notes
- Fire now: The system automatically prints a preparation ticket, and the items appear in the Current tab on the KDS.
- Scheduled items: The system counts down the sending delay. When the countdown reaches 0 minutes, the preparation ticket is printed automatically.
- Items waiting for their scheduled sending time: Users can select Fire now again to send them to the Kitchen/Bar for immediate preparation.
- Items on Hold: Users can select a sending delay or choose Fire now.
- Changing from Dine-in to To-go or Delivery: Items with different sending delays are combined into a single card.
- Merging orders or changing tables: When an updated notification is printed for the Kitchen/Bar, it includes only items that have already been sent. Items sent later display the new table and order information.
Have a nice day!


